
Popular

- Adult Content Policy – Blur & Reveal
- Wiply Community Guidelines
- How Wiply Balances Image Safety and User Choice
- Exploring Your Wiply Account Settings
- Accessing Your Account Options on Wiply
- What’s Included? A Guide to Wiply’s FREE and Paid Features
- How can I change my email address on Wiply?
- How do I delete my Wiply account?
- How to Sign Up / Register on Wiply
- How do I enable Two-Factor Authentication (2FA)?
- How to Perform a Hard Refresh in Chrome, Firefox, Edge, and Safari

Second Life can be an incredibly immersive experience, but a laggy viewer or low frame rates can quickly break that immersion. The Firestorm viewer, while packed with features and customization options, can also be resource-intensive. The good news is that Firestorm offers a vast array of settings you can tweak to significantly improve performance. This guide will walk you through the most impactful adjustments to help you achieve a smoother, more enjoyable Second Life.
Disclaimer: The optimal settings can vary greatly depending on your computer’s hardware (CPU, GPU, RAM), your internet connection, and even the specific Second Life region you’re in. Think of this guide as a starting point for your own experimentation. It’s best to change one setting at a time and observe its effect.
As of May 2025, these settings are generally applicable, but viewer updates can sometimes change menu locations or specific options. Always refer to the latest Firestorm documentation if you find discrepancies.
Understanding Performance Metrics
Before we dive in, let’s clarify what we’re trying to improve:
- FPS (Frames Per Second): This is the number of images your computer displays per second. Higher FPS means smoother visuals. You can view your FPS in Firestorm by pressing Ctrl+Shift+1 (which brings up the Statistics bar) or often via a dedicated FPS counter in the viewer UI. Aim for at least 20-30 FPS for a decent experience, though higher is better.
- Lag: This is a general term for delays and unresponsiveness.
- Client-side lag: Your computer is struggling to render the environment or process data. This is what most of these tweaks will address.
- Network lag: Caused by a slow or unstable internet connection.
- Server-side lag: The Second Life region (sim) itself is overloaded or performing poorly. You have little control over this beyond moving to a less laggy region.
Accessing Preferences
Most performance settings are found in the Firestorm Preferences window. You can access this by:
- Pressing Ctrl+P.
- Going to Avatar > Preferences from the top menu bar.
Key Areas for Performance Tweaks
Let’s go through the most important tabs and settings within the Preferences window:
1. Graphics Tab
This is where you’ll find the most critical performance settings.
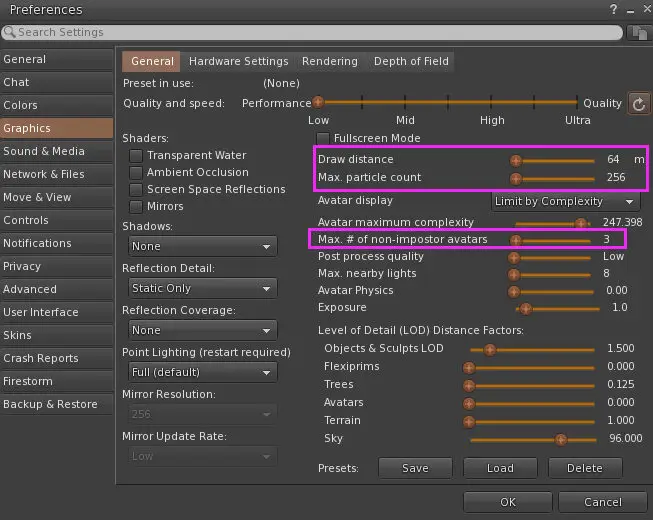
A. General Sub-tab:
- Draw Distance:
- What it does: Controls how far you can see objects, avatars, and terrain.
- Performance Impact: MASSIVE. Higher draw distances require your computer to render much more.
- Recommendation: For general use, try values between 64m and 128m. If your performance is poor, try as low as 32m or 48m in crowded areas. For photography, you might temporarily increase it, but expect a performance hit.
- Max. Particle Count:
- What it does: Limits the number of particles (used for effects like smoke, sparkles, some prim effects) rendered.
- Performance Impact: High. Particle-heavy items or effects can cripple FPS.
- Recommendation: Set this to a lower value, like 512-1024 (or even lower if needed). Default is often 4096.
- Max. # of non-impostor avatars:
- What it does: Determines how many full-detail avatars are rendered around you. Avatars beyond this number are rendered as “impostors” (simplified, billboard-like representations), which are much less resource-intensive.
- Performance Impact: VERY HIGH. Rendering many complex avatars is one of the biggest drains on performance.
- Recommendation: Set this to a low number, such as 3 to 10. In very crowded events, even 1 or 2 can make a difference.
- Avatar Level of Detail (LoD): (May be a slider or dropdown)
- What it does: Affects how quickly avatar complexity is reduced as they get further away.
- Performance Impact: Moderate to High.
- Recommendation: Try a lower setting (e.g., Low or a value towards the left of the slider).
- Anisotropic Filtering:
- What it does: Makes textures look sharper at oblique angles.
- Performance Impact: Low to Moderate.
- Recommendation: Usually safe to leave on, but unchecking it can give a small FPS boost on lower-end systems.
- Antialiasing (AA):
- What it does: Smooths out jagged edges on objects.
- Performance Impact: Moderate to High, depending on the level (e.g., 2x, 4x, 8x).
- Recommendation: For significant performance gains, turn this Off. If you must have it, use the lowest setting (2x).
- Ambient Occlusion (SSAO):
- What it does: Adds soft shadows and depth to scenes.
- Performance Impact: High.
- Recommendation: Turn this Off for a noticeable performance boost.
- Enable VBO (Vertex Buffer Objects):
- What it does: A graphics rendering optimization.
- Performance Impact: Should generally improve performance.
- Recommendation: Keep this Enabled. Test disabling it only if you suspect it’s causing graphics issues (rare).
- Enable OpenGL Shader Model 3.0 (if available and you have compatible hardware):
- What it does: Allows for more advanced graphical effects.
- Performance Impact: Can improve performance for some effects but ensure your hardware supports it well.
- Recommendation: Usually best left enabled if supported.
B. Advanced Lighting Model / Shadows Sub-tab (or similar name):
- Advanced Lighting Model (ALM) / Deferred Rendering:
- What it does: Enables projected lights, materials, and shadows.
- Performance Impact: VERY HIGH.
- Recommendation: If you don’t need these advanced visual features or are struggling with FPS, uncheck “Advanced Lighting Model.” This will disable shadows and projected lights, providing a massive performance boost.
- Shadows:
- What it does: Renders shadows from the sun, moon, and projectors (if ALM is on).
- Performance Impact: EXTREME.
- Recommendation: If ALM is on, set shadows to “None” for the best performance. If you want shadows, “Sun/Moon” is less demanding than “Sun/Moon + Projectors.” Keep shadow resolution low.
C. Hardware Settings / Rendering Sub-tabs (names may vary):
- Texture Memory (VRAM):
- What it does: Amount of your graphics card’s memory allocated for textures.
- Performance Impact: Setting this too low can cause texture thrashing and lag.
- Recommendation: Often, the “Auto” setting works well. If you know your VRAM amount, you can set it manually (e.g., if you have 4GB VRAM, you might set it to 2048MB or a bit higher for Firestorm). Don’t set it higher than your actual VRAM. Firestorm usually caps this setting automatically.
- Enable Lossy Texture Compression:
- What it does: Compresses textures to save memory, potentially at a slight cost to visual quality.
- Performance Impact: Can improve performance, especially on systems with limited VRAM.
- Recommendation: Try enabling this if you are VRAM-limited.
- Object & Sculpt LoD / Tree LoD / Terrain LoD Factor:
- What it does: Controls the detail level of objects, trees, and terrain at a distance.
- Performance Impact: Moderate.
- Recommendation: Lower these values (move sliders to the left) to reduce detail and improve performance.
- Water Reflections:
- What it does: Renders reflections on water surfaces.
- Performance Impact: Moderate to High depending on the complexity of the reflection.
- Recommendation: Set to “Minimal” or “None” for performance gains.
2. Network & Files Tab (or Network & Cache)
- Cache Size:
- What it does: Stores frequently accessed data (textures, object data) locally to speed up loading.
- Performance Impact: A properly sized cache helps with faster re-rezzing and less stuttering.
- Recommendation: A size between 1GB and 2GB is generally good. Setting it too large doesn’t necessarily help more and can take up disk space.
- Clear Cache (Button):
- What it does: Deletes the cached files.
- When to use: If you experience persistent inventory issues, texture problems, or after major viewer updates. It’s not a regular performance tweak but a troubleshooting step. Your inventory will need to repopulate, which can be slow initially.
- Maximum bandwidth:
- What it does: Tells the SL servers how much data your connection can handle.
- Performance Impact: Setting it too low can cause slow rezzing. Setting it too high (beyond what your connection can actually sustain) can lead to packet loss and lag.
- Recommendation: Start with a moderate value like 1500-3000 kbps. If you have a very fast, stable connection, you might go higher. If you have a slower connection, try 500-1000 kbps. Some users test their actual download speed and set it to about 80% of that.
3. Firestorm Specific Settings (Often under Firestorm Tab -> Performance, Extras, or UI)
Firestorm often includes unique optimizations:
- UI Brightness/Color adjustments: While not direct performance, a simpler UI can feel more responsive.
- Reduce UI Updates in Background: If such an option exists, it can free up small amounts of CPU.
- Fast Timers / Octane Render Optimizations: Look for settings specifically labeled for performance. These are usually enabled by default but worth checking.
- LOD Culling: Options that more aggressively reduce the detail of objects or avatars not directly in your view.
- HTTP Get Textures / Other HTTP fetching options: Ensure these are enabled for generally faster texture loading over the newer CDN.
4. Sound Tab
- Enable/Disable UI Sounds: Minor, but every little bit can count on very low-end systems.
- Number of simultaneous audio streams: Lowering this might offer a tiny bit of relief on extremely CPU-constrained systems, but it’s usually not a major factor.
Other Important Performance Tips (Beyond Preferences)
- Minimize Script Load (Avatar Script Count/Memory):
- Your avatar’s attachments (HUDs, jewelry, AOs, hair with scripts) consume script memory. Press Ctrl+Shift+1 to see “Script mem used.” High script usage (e.g., over 20-30MB on your avatar) can cause lag for you and others.
- Remove unnecessary HUDs and scripted attachments.
- Derender or Block Avatars:
- In extremely crowded places, right-click on avatars far away or those causing lag and choose “Derender” or “Block.” Firestorm often has an “Area Search” tool (Radar) that can help manage rendering of avatars in the vicinity.
- Keep Viewer and Drivers Updated:
- Ensure you are using a recent version of Firestorm.
- Keep your graphics card drivers up to date from NVIDIA, AMD, or Intel’s website.
- Region Performance:
- Sometimes, the lag isn’t you; it’s the sim. Check the region’s FPS in the Statistics bar. If it’s very low (e.g., below 10-15), the sim itself is struggling.
- Reduce Your Own Attachment Complexity:
- Highly complex mesh attachments with many textures can impact your performance.
- Restart the Viewer:
- If you’ve been online for many hours, especially teleporting frequently, restarting the viewer can sometimes clear up accumulated issues and improve performance.
Testing and Finding Your Sweet Spot
- Change One Setting at a Time: This is crucial. If you change multiple things, you won’t know what helped (or hurt).
- Observe FPS: Keep an eye on your FPS (Ctrl+Shift+1) before and after each change.
- Test in Different Environments: Settings that work well in a quiet, empty region might not be suitable for a crowded club or a highly detailed shopping area.
- Patience is Key: Finding your optimal balance can take time and experimentation.
- Consider Presets: Some viewers allow saving graphics presets. If Firestorm has this, use it to switch between “High Performance” and “High Quality” settings quickly.
Optimizing Firestorm for performance is a balancing act between visual quality and smoothness. By systematically going through these settings and understanding their impact, you can tailor the viewer to your specific hardware and preferences. The goal is to create a more fluid and enjoyable Second Life experience, allowing you to focus on exploring, socializing, and creating, rather than fighting lag. Happy tweaking!