
Popular

- Adult Content Policy – Blur & Reveal
- Wiply Community Guidelines
- How Wiply Balances Image Safety and User Choice
- Exploring Your Wiply Account Settings
- Accessing Your Account Options on Wiply
- What’s Included? A Guide to Wiply’s FREE and Paid Features
- How can I change my email address on Wiply?
- How do I delete my Wiply account?
- How to Sign Up / Register on Wiply
- How do I enable Two-Factor Authentication (2FA)?
- How to Perform a Hard Refresh in Chrome, Firefox, Edge, and Safari

Second Life isn’t just a virtual world; it’s a canvas for creativity in countless forms. Among these, virtual photography stands out as a captivating art form, allowing residents to capture breathtaking moments and craft stunning visual narratives. While the in-world camera offers a fantastic starting point, mastering the art truly takes flight when you embrace the power of custom lighting. Let’s delve into the essentials of setting up your virtual scenes, focusing on the versatile “light on a box” technique and the magic of textured illumination.
Beyond the Snapshot: Setting the Stage for Stunning Shots
Before you even think about snapping a picture, consider your composition. Just like in real-life photography, the arrangement of elements within your frame is crucial. Think about:
- Rule of Thirds: Imagine dividing your viewfinder into nine equal sections with two horizontal and two vertical lines. Placing key elements along these lines or at their intersections often creates more visually appealing and balanced compositions.
- Leading Lines: Use natural or architectural elements within your scene to draw the viewer’s eye towards your focal point. Roads, rivers, fences, or even lines of objects can serve this purpose.
- Depth of Field: While Second Life’s built-in camera controls offer some depth of field adjustments, strategic placement of your subject and background can create a sense of depth and separation.
- Angles and Perspectives: Don’t be afraid to experiment! Shoot from low angles to make your subject appear grander, or from high angles for a different perspective. Orbit your camera to find the most compelling viewpoint.
Illuminating Your Vision: The Power of the “Light on a Box”
Now, let’s talk about bringing your scenes to life with light. The “light on a box” method is a fundamental technique that offers immense flexibility and control. Here’s how to set it up:
1. Rez a Primitive: In your Second Life inventory, go to the “Create” menu (or use Ctrl+4) and rez a simple cube or any other basic primitive shape. This will be the foundation for your custom light.
2. Scale and Position: Resize the box to a manageable size – perhaps something akin to a small lamp or a panel light, depending on the effect you want to achieve. Position it strategically within your scene. Consider where natural light might fall or where you want to create a specific highlight or shadow.
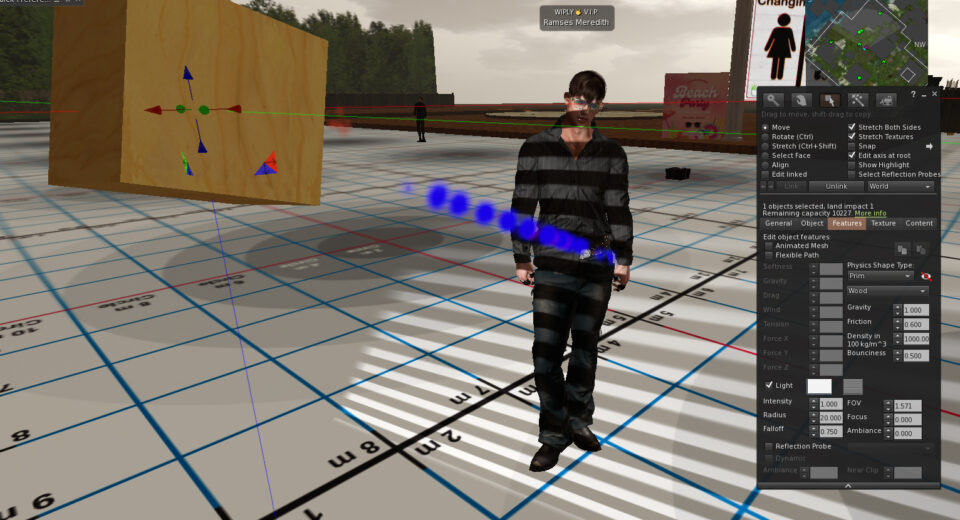
3. Accessing the Features Tab: Right-click on your newly rezzed box and select “Edit.” In the Edit window, navigate to the “Features” tab.
4. Enabling Local Light: Under the “Light” section, check the box next to “Local Light.” This will activate the light source emanating from your primitive.
5. Color and Intensity: Experiment with the “Color” and “Intensity” sliders.
- Color: Click the color swatch to open a color picker and choose the hue you desire. Warmer colors (reds, oranges, yellows) can create a cozy or dramatic feel, while cooler colors (blues, greens) can evoke a sense of calmness or mystery.
- Intensity: This slider controls the brightness of the light. Start with a low value and gradually increase it until you achieve the desired illumination. Be mindful of overexposure, which can wash out details.
6. Radius and Falloff:
- Radius: This determines the reach of your light. A smaller radius creates a more focused beam, while a larger radius illuminates a wider area.
- Falloff: This controls how gradually the light intensity decreases with distance. A linear falloff means the light fades evenly, while other options like “quadratic” or “inverse square” create a more realistic and rapid decrease in intensity. Experiment to see what best suits your scene.
Texturing Your Light: Adding Visual Flair and Realism
This is where the “light on a box” technique truly shines! By applying textures to your light source, you can create the *appearance* of different types of lights and even project patterns onto your scene.
1. Select the Texture Tab: In the Edit window of your light box, navigate to the “Texture” tab.
2. Choose Your Texture: Click on the texture swatch to open your inventory and select an appropriate texture. Here are some ideas:
- Soft Glow: Use a blurred, radial gradient texture in a light color to simulate a soft, diffused light source like a lamp or a window glow.
- Hard Light: A plain white or slightly off-white texture will create a more direct and intense light.
- Strip Lights or Panels: Use a rectangular texture with a gradient or a series of light-colored stripes to mimic the look of LED panels or fluorescent tubes.
- Gobo Effects (Projected Patterns): This is where it gets really interesting! Use textures with patterns (e.g., leaves, window frames, abstract designs) in shades of gray or black and white. The lighter areas of the texture will allow more light to pass through, effectively projecting the pattern onto the surfaces your light illuminates. Experiment with the “Full Bright” option in the Features tab (under “Texture”) to ensure the texture itself doesn’t cast shadows.
3. Adjust Texture Parameters:
- Repeat: Control how many times the texture tiles across the surface of your light box.
- Offset: Adjust the horizontal and vertical positioning of the texture.
- Rotation: Rotate the texture to achieve the desired orientation of your light pattern.
Putting It All Together: Creating Stunning Scenes
The real magic happens when you combine careful composition with strategically placed and textured lights. Consider these scenarios:
- Simulating Sunlight: Position a large, slightly yellowish light source outside a window with a subtle “window pane” gobo texture to cast realistic shadows and highlights indoors.
- Creating Dramatic Portraits: Use a focused, slightly warm light source to highlight your subject’s face, and perhaps a softer, cooler fill light to reduce harsh shadows.
- Adding Atmosphere to Landscapes: Use multiple, subtly colored light sources to mimic moonlight, streetlights, or the glow of distant objects. Experiment with gobo textures to create interesting shadow patterns on the ground or foliage.
- Highlighting Architectural Details: Use linear light sources with appropriate textures to accentuate the lines and forms of buildings or structures.
Practice and Experimentation: The Keys to Mastery
Like any art form, virtual photography in Second Life requires practice and a willingness to experiment. Don’t be afraid to try different light placements, colors, intensities, and textures. Observe how light interacts with different surfaces and materials in the virtual world.
By mastering the “light on a box” technique and the creative use of textures, you’ll unlock a new dimension in your Second Life photography, transforming simple snapshots into truly stunning works of virtual art. So, rez a box, play with the light, and start painting your own pixelated masterpieces!